You can see four distinct panes marked with different colors. The leftmost one is the Address pane; each number in the pane shows the address of the first byte of the corresponding line. The only exception is the line on which the input caret is - it shows the address of the current byte, not the first one. The addresses are shown as hexadecimal numbers but if you point the mouse cursor to an address, the decimal value will appear in the Quick View popup window.

The next is the Hex pane, which displays the file contents as an array of hex bytes. The light green ANSI pane shows the file contents as characters, and the rightmost UNICODE pane shows two-byte UNICODE characters.
Note that all three data panes show different representations of the same data. If you change data in any data pane, the other two will change accordingly. You can switch between the panes by pressing the Tab or Shift-Tab key, or just by pointing the mouse cursor and pressing the left mouse button.
Inspecting Data
Hex numbers may be good for computers, but how can one convert a hex number to a more human-friendly decimal value? Easy! First, select the number either with your mouse, or by using the arrows key while holding down the Shift key. Second, move the mouse cursor to the selected area, and FlexHEX will display all the valid representations in the Quick View popup window.

Sometimes there is no valid representation at all. For example, if you select five bytes, there will be no Quick View window because FlexHEX knows no object five bytes long. However any 1, 2, 4, 8, or 16 byte long field has at least one valid representation. In general, when the mouse cursor changes to the arrow-with-question-mark shape, this means that FlexHEX has something to show you and the Quick View window is ready to appear.
Editing Data
Now that we know the basics let's go straight to hex editing. Start FlexHEX and you will see the main editing window with an automatically created new empty file. It has zero length but can be extended - the light gray boxes mark the positions where you can enter new data. Enter the hex bytes "4D 61 72 79 20" starting from the position 0, where the input caret initially was:

Now press the Tab key to switch to the green ANSI pane and type in "had a little lamb". It is easy to see that every byte in the Hex pane corresponds to some character in the ANSI pane. When you enter a hex value, the corresponding character appears in the ANSI pane and vice versa.
Don't be afraid to make a mistake - FlexHEX has unlimited Undo/Redo list. If you did something wrong, just press Ctrl-Z to undo the action.
Editing Existing File
A simple but rather typical task is to go to some address and replace some bytes. As an example we will change the byte string "EB 1F 5F FB" to "01 00 00 00" at the address 52E1C.
The first step is to find the data to be modified. Select the Navigation / Go To command or just press Ctrl-G and enter the address:
Don't forget to pay attention to the Dec/Hex selector. FlexHEX is smart enough to recognize a hexadecimal number if it contains hex digits A to F, but if the number consists of decimal digits only, make sure you have selected the correct number radix.
Now press the Go To button and you are there:
We have found the data, but before typing in the new values check the Insertion Mode indicator in the status bar. If it displays OVERWRITE, the newly entered data will replace the data at the current position marked by the blinking input caret.
The INSERT mode works differently. The existing data starting from the current position are shifted below, making place for the data you are entering. Note that this will change the position of all data objects below the insertion point. Many files get corrupted if their data have been shifted, so be careful and pay attention to the shift indicator in the status bar.
If the current mode is INSERT, press the Insert key to switch to the OVERWRITE mode.
Now type in the new hex data:
You may have noticed that a new Modified tab has appeared in the Navigation panel. Click the tab to open the pane:
This pane lists all modified areas in the file. Click the area starting or ending address to jump there; to select the whole area, click the size field.
Changing Typed Values
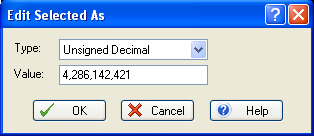
Sometimes you need to make modification to a typed object, not just to a sequence of hex bytes. With FlexHEX, it is no more complicated than simple hex editing. Select the object (usually 1, 2, 4, 8, or 16 bytes long), right-click and select the Edit Selected As command from the menu:

Select the appropriate representation and enter the new value.


